Homemade Vanilla Ice Cream with Honey: With or Without a Machine

By Roel van den Bogaard, personal trainer and founder of Aurora Personal Training in Eindhoven.

This homemade vanilla ice cream uses a cooked custard base of whole milk, cream, egg yolks, honey, coconut blossom sugar and a vanilla pod. Heat the custard to 82–84°C while stirring, chill it completely, then churn it in an ice cream maker. Without a machine, freeze the chilled base and stir it regularly as it sets.

The result is a rich vanilla ice cream with a gentle honey flavour. Making it yourself lets you choose the ingredients and serving size.

Below is the complete Aurora recipe, including the method without an ice cream maker, tips for a creamy texture and the original flavour variations.

Homemade vanilla ice cream recipe

Recipe details Time or information
Yield One batch; the number of servings depends on portion size
Vanilla infusion Approximately 10 minutes
Beating the egg yolks 2–3 minutes
Custard temperature 82–84°C
Refrigerator time At least 4 hours, or overnight
Churning Follow the manufacturer’s instructions; approximately 20 minutes as a guide
Additional freezing Approximately 2–4 hours after churning

Plan ahead. The total time also includes heating, rapid cooling and freezing. Your machine and freezer temperature affect how quickly the ice cream is ready.

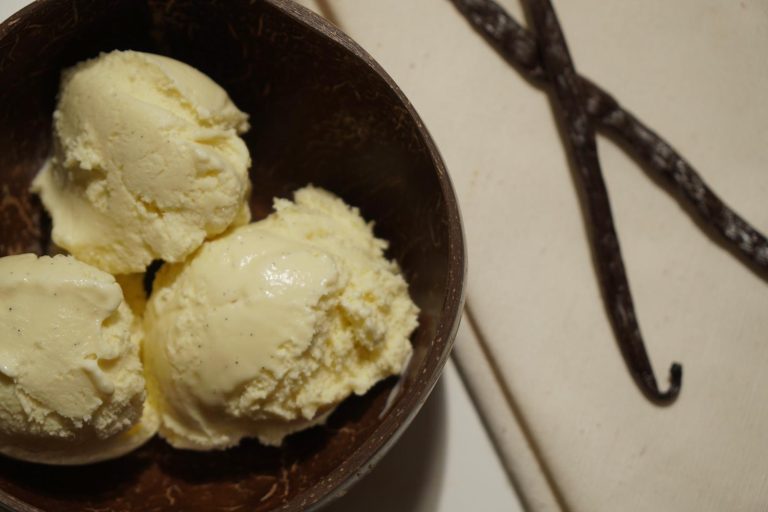
Homemade vanilla ice cream with honey and visible vanilla seeds

Ingredients

  • 400 ml whole milk
  • 350 ml whipping cream
  • 80 g mild honey, such as acacia or blossom honey
  • 35 g coconut blossom sugar
  • 5 egg yolks
  • 1 vanilla pod
  • A pinch of fine sea salt

Equipment

  • Saucepan
  • Whisk
  • Silicone spatula
  • Fine sieve
  • Clean mixing bowls
  • Food thermometer
  • Ice cream maker, recommended but not essential
  • Freezer-safe container with a lid

A food thermometer is strongly recommended. The thickness of the custard alone does not reliably show which temperature it has reached.

How to make vanilla ice cream with an ice cream maker

Step 1: prepare the vanilla base

Split the vanilla pod lengthways and scrape out the seeds.

Place the whole milk, cream, vanilla seeds, empty pod, half the coconut blossom sugar and a pinch of salt in a saucepan.

Heat gently to approximately 75–80°C. Do not let the mixture boil.

Remove from the heat, cover and leave the vanilla to infuse for approximately ten minutes.

Step 2: beat the egg yolks

Beat the five egg yolks with the remaining coconut blossom sugar for two to three minutes.

The mixture should become slightly thicker and creamier. Because coconut blossom sugar is darker than white sugar, it may not turn pale yellow.

Add the honey and mix until smooth.

Step 3: temper the eggs

Remove the vanilla pod from the warm milk mixture.

While whisking, pour a small amount of the warm milk into the egg yolks. Gradually add more, continuing to stir.

This is called tempering: warming the yolks gradually reduces the chance of them cooking into lumps.

Step 4: cook the custard

Return the entire mixture to the saucepan.

Heat gently, stirring continuously with a silicone spatula, including across the bottom and around the edges.

Bring the custard to 82–84°C, measured with a food thermometer. Do not let it boil.

The custard should thicken slightly and coat the back of a spoon. The original spoon test can help assess texture: draw a line through the custard coating on the back of the spoon. If the line remains visible, the mixture has thickened. Do not use this test instead of measuring the temperature.

Step 5: strain and cool rapidly

Pour the custard through a fine sieve into a clean, heatproof bowl.

Place the bowl in an ice-water bath and stir regularly. Prevent water from entering the custard. This cools the base faster than leaving it on the worktop.

Cover the cooled base and refrigerate at approximately 4°C for at least four hours. You can also leave it overnight.

Use clean equipment and avoid leaving the prepared base outside refrigeration unnecessarily.

Step 6: churn and freeze

Prepare your ice cream maker according to its instructions. Some machines have a bowl that needs to be frozen completely in advance.

Pour the thoroughly chilled base into the machine and follow the manufacturer’s directions. Approximately twenty minutes is a guide; your machine may need longer.

Once the ice cream has a soft-serve consistency, transfer it to a freezer-safe container with a lid.

Freeze for approximately another two to four hours, or until it reaches your preferred firmness.
How to make vanilla ice cream without a machine

Use the same ingredients and prepare the same cooked custard. Chill the base completely before starting.

  1. Pour the cold base into a shallow, freezer-safe container.
  2. Place it in the freezer.
  3. After approximately 45 minutes, briefly remove the container.
  4. Stir vigorously with a whisk, fork or spatula, breaking up the frozen edges.
  5. Return it to the freezer immediately.
  6. Repeat every 30–45 minutes, stirring four to six times in total.
  7. Allow it to continue freezing until sufficiently firm.

Stirring redistributes the freezing mixture and breaks up developing ice crystals. The result may be firmer and less airy than ice cream made in a machine.

Optional: briefly blend during freezing

The original additional tip is to blend the mixture briefly after approximately two hours.

Only do this while it is still soft enough and your appliance is suitable for thick, partially frozen mixtures. Do not force hard ice pieces through a stick blender or countertop blender.

Return the mixture to the freezer immediately afterwards.

Tips for creamy vanilla ice cream

Keep the original proportions

Cream, milk, egg yolks and sugars all affect the texture. Reducing the honey or replacing the cream may make the ice cream harder or icier.

Use comparable products when repeating the recipe.

Chill the base completely

A warm base puts more demand on the machine and takes longer to freeze. Allow enough refrigerator time and check that the mixture is cold throughout.

Do not boil the custard

Excessive heat can cause the egg yolks to form lumps. Heat gently and keep stirring.

Store in a sealed container

Close the container securely and limit repeated warming and cooling. Scoop out a portion and return the rest to the freezer promptly.

Common mistakes

Problem What to check
Pieces of cooked egg The mixture may have heated too quickly, become too hot or not been stirred sufficiently
Icy texture The base may not have chilled sufficiently, frozen quickly enough or been stirred regularly
Ice cream stays soft Allow more time and check the freezer and machine
Ice cream is difficult to scoop Let only the portion you need soften briefly
Results vary between batches Check ingredients, measurements and method

A fine sieve can remove small lumps. It will not necessarily restore a badly curdled custard.

Is homemade vanilla ice cream healthier?

Making ice cream yourself gives you control over the ingredients. It does not automatically make it low in calories or healthier than every shop-bought version.

This recipe contains cream, whole milk, egg yolks and added sugars. It remains a dessert that you can enjoy in an appropriate portion.

Is this ice cream sugar-free?

No. Honey and coconut blossom sugar are added as sweeteners. Milk and cream also contain naturally occurring milk sugar.

“No added sugar” therefore does not describe this recipe accurately.

Is honey healthier than ordinary sugar?

Honey is not a meaningfully healthier alternative to ordinary sugar. Its small amounts of other substances do not establish a significant nutritional advantage.

In this recipe, honey is chosen for its flavour and effect on texture.

How many calories are in a scoop?

That depends on your ingredients, the weight of the egg yolks and the serving size.

For a reliable calculation, use the nutritional information for your actual ingredients. Weigh the finished batch, then calculate a portion such as 75 grams.

A scoop is not a fixed weight.

How to store homemade vanilla ice cream

Keep the ice cream in a well-sealed container at −18°C or colder.

The original two-to-three-week recommendation can serve as a practical quality guideline, rather than a tested shelf life for this specific recipe. Label the container with the preparation date.

Avoid leaving the entire container out for an extended period to serve one portion. Do not refreeze fully melted ice cream.

Frequently asked questions

Why use egg yolks?

Egg yolks help thicken the custard and contribute to a creamy texture. They contain fats, proteins and emulsifying substances.

Can you leave out the egg yolks?

Not without changing the recipe. The five egg yolks are part of this custard base. For egg-free ice cream, use a recipe developed for that purpose.

Is this recipe suitable for milk or egg allergies?

No. It contains milk and egg. It is also neither lactose-free nor vegan.

Do you need to heat the ice cream base?

Yes. In this recipe, the egg yolks are heated when cooking the custard. Freezing alone does not replace careful preparation of the egg base.

Why not call this “unprocessed vanilla ice cream”?

The ingredients are heated, beaten, mixed and frozen. “Homemade vanilla ice cream with honey” describes the recipe more clearly.

Variations on the original recipe

These variations change the flavour and may also affect firmness and freezing time.

  • Strawberry vanilla: add 250 grams of puréed strawberries to the cooled base.
  • Mango vanilla: mix 250 grams of ripe mango purée into the cooled base.
  • Cinnamon vanilla: add one teaspoon of cinnamon during heating.
  • Vanilla with dark chocolate: add chocolate pieces near the end of churning, following your machine’s instructions. Without a machine, fold them into the partially frozen ice cream.

Wash and prepare fresh fruit hygienically. For frozen fruit, follow the preparation instructions on the packaging.

More Aurora recipes and nutrition tips

For a chilled breakfast or snack, try our mango and coconut chia pudding. This link opens the Dutch recipe.

For another breakfast option, explore our carrot cake oatmeal.

Want to understand how different foods fit into your day? Read our guide to protein, fats and carbohydrates.

At Aurora Personal Training, we combine training with attention to nutrition and lifestyle. Making room for a dessert can be part of an approach you can maintain.

Book a free intake at Aurora Personal Training in Eindhoven to discuss habits that suit your goals.

Request your free trial lesson now!

Contact us today and schedule your free trial lesson!


    More articles

    No-Bake Cookie Dough Bars with Date Caramel and Chocolate

    3 Bodyweight Exercises for Strength: Pull-Ups, Push-Ups and Squats

    Shoulder Warm-Up: 3 Exercises for Strength Training

    Request your free trial lesson now!

    Contact us today and schedule your free trial lesson!